Articles contributed by the community, curated for your enjoyment and reading.
Filters
Reset
Chicken Nachos
Loaded with spicy pulled rotisserie chicken and ungodly amounts of cheese, these chicken nachos are hearty and satisfying – and everyone is happy when you say, “Nachos for dinner!” Whenever I visit my sister in New York City, we pick one night to leave the kids and husbands at home to go out for a girls’ night. We always dine at the same Mexican restaurant around the corner from her apartment, and we always skip entrees and order a bunch of appetizers instead. It feels like such an indulgence to enjoy chips, guac, and the like without having to worry about filling up before the main course. I love to eat this way at home, too, but it’s harder when feeding a family. These chicken nachos are one of the few appetizers I can get away with serving for dinner. Loaded with pulled rotisserie chicken in a spicy chipotle-tomato sauce and ungodly amounts of cheese, they are hearty and satisfying – and everyone is happy when I say, “Nachos for dinner!” This recipe makes two large sheet pans of nachos. If you want to mix things up, the chicken mixture can also be used as a filling for quesadillas, tacos or tostadas. What you’ll need to make chicken nachos You’ll notice that the recipe calls for two types of cheese: a Mexican blend and pecorino Romano, a sharp, salty Italian cheese made from sheep’s milk. The pecorino might seem like an odd addition to nachos, but it’s an excellent substitute for the funky, longer-aged Mexican cheeses that can be hard to find. I know almost 8 cups of cheese seems like a lot, but good nachos require a generous topping of melted cheese. Plus, light-on-the-cheese nachos are just plain sad! For the guacamole, you can make your favorite recipe — or do as I do and prepare a quick version by mashing some diced avocado with a little lime juice and salt, to taste. How to make chicken nachos Begin with the chicken. Heat the oil in a large pan over medium heat. Add the onion and garlic and cook, stirring frequently, until soft and translucent, about 5 minutes. Do not brown; reduce the heat if necessary. Add the tomato sauce, chipotle peppers and sauce, sugar, cumin, oregano, and salt. Bring to a gentle boil, then reduce the heat to low and simmer, uncovered, for about 10 minutes. Add the chicken and cilantro. Mix and set aside. For the nachos, arrange the tortilla chips in a single layer, overlapping slightly, on two 13 x 18-inch baking sheets. Spread the chicken evenly over the chips. Sprinkle the cheeses evenly over the chicken. Bake until the cheese is melted, 5 to 8 minutes. Remove the nachos from the oven, then sprinkle with scallions and cilantro. Serve immediately, passing the guacamole, sour cream, and lime wedges separately. Note: This recipe has been written by Jenn Segal and republished on MudMatter with Author’s Permission. Please find the original link here – Chicken Nachos.

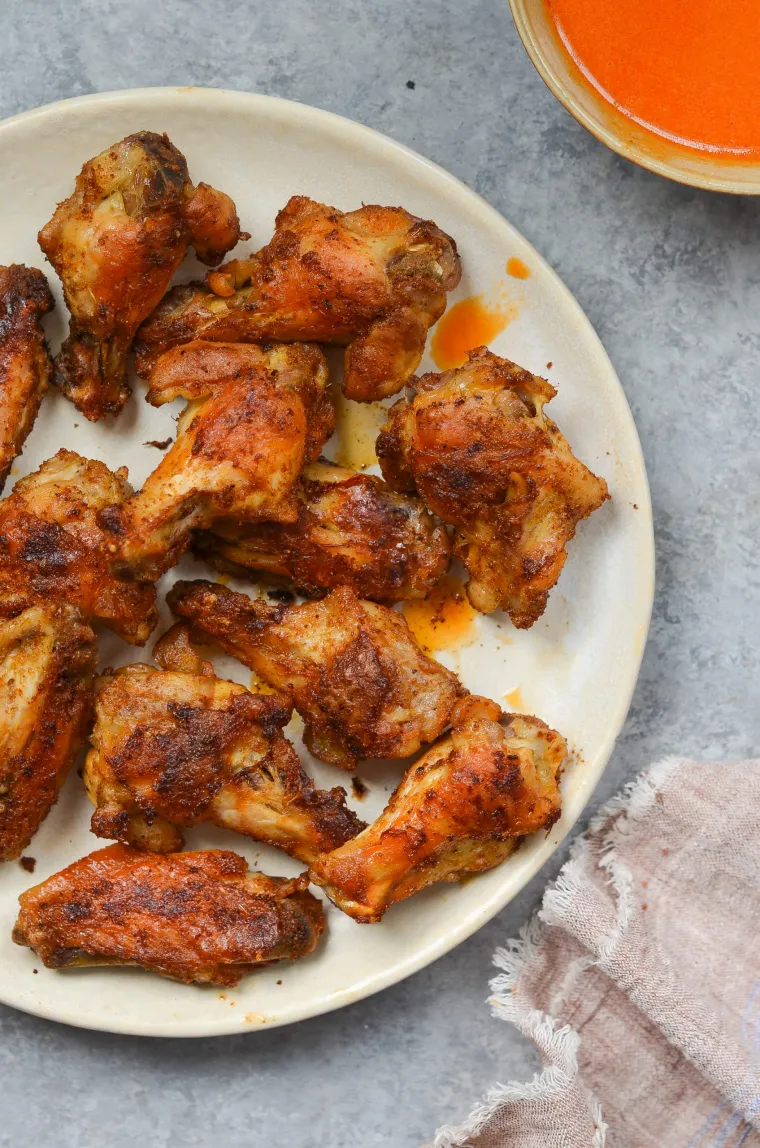
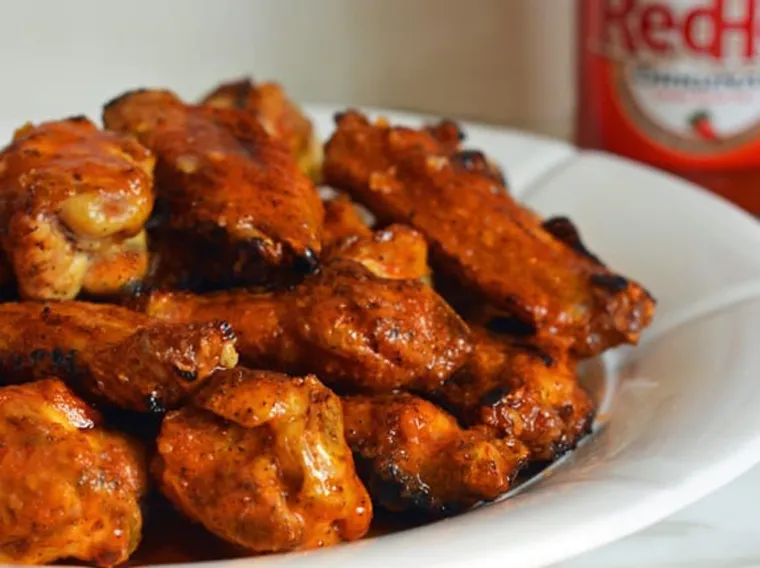
Crispy Baked Chicken Wings
Parboiled, spiced, and roasted in a high-heat oven, these baked chicken wings are crispy and packed with flavor. I love crispy chicken wings but not always the thought of deep-frying. Grilled chicken wings are a great option in the summertime, but what’s a wing lover to do the rest of the year? Baked chicken wings are a popular alternative, but the problem with most recipes is that the wings are never quite crispy enough. These baked chicken wings, however, are quickly parboiled before roasting, which renders excess fat and guarantees the wings bake up nice and crispy. The spice rub – a blend of salt, chili powder, cumin, and smoked paprika – gives the wings delicious flavor. You really don’t need a sauce, but I’ve included an easy Buffalo sauce recipe in case you’d like to serve them Buffalo-style. You can also serve them with blue cheese or ranch dressing. What You’ll Need To Make Baked Chicken Wings Step-by-Step Instructions In a large pot, bring 4 quarts of water and 1 tablespoon of salt to a rapid boil. Add the chicken wings, return to a boil, and boil them for 7 minutes. Drain the wings thoroughly in a colander. Place the wings on a 13 x 18-inch baking sheet. Using a wad of paper towels, blot the wings as dry as possible. Drizzle the oil over the wings and sprinkle with 1 teaspoon salt, the chili powder, cumin, and smoked paprika. Toss with a rubber spatula until the wings are evenly coated. Bake for 15 minutes, then remove the pan from the oven and, using tongs, flip the wings over. Return to the oven and bake for about 10 minutes more, or until the wings are crispy all over. To make the Buffalo sauce, combine the butter and hot sauce in a small bowl. Whisk to combine. It will solidify as it cools; you can reheat it in the microwave or on the stovetop if necessary. Transfer the wings to a serving platter and serve with the Buffalo sauce, if desired. Note: This recipe has been written by Jenn Segal and republished on MudMatter with Author’s Permission. Please find the original link here – Crispy Baked Chicken Wings.

Differences between IEnumerable and IQueryable in C#
In every .NET application we need to manipulate IEnumerable and IQueryable interfaces to hold collections. The basic use of IEnumerable and IQueryable is to hold the collection of data & perform Ordering, Grouping & Filtering of data based on project/application requirements. The first thing to keep in mind is that since the IQueryable interface is an inheritance of IEnumerable, it possesses all of IEnumerable's capabilities. Both are limited to process on C# collections. The important difference between IEnumerableand IQueryable is: IQueryable - The Filter is apply at server level/side and fetch only required results from source. So processing time is less. IEnumerable- It fetch all data from source first and later apply the filter at client level/side. Which can be result in fetching unnecessary data and it increase processing time. Lets understand this with an example. We have created Console application in .NET Core to fetch Books from SQL Server database and we are using Entity Framework Core to fetch the books (books table). We built it over Code-First approach. This is our Book.cs Entity [Table("Books")] public class Book { [Key] public int BookId { get; set; } [StringLength(255)] public string? Title { get; set; } public decimal Price { get; set; } } We have around 10 records added into database by using seed data method. Lets understand the differences by using below code. We have written both queries in LINQ. class Program { static void Main(string[] args) { using (var context = new BookDemoDbContext()) { var booksIEnumerable = (from book in context.Books select book) .AsEnumerable<Book>().Take(2).ToList(); var booksIQurable = (from book in context.Books select book) .AsQueryable<Book>().Take(2).ToList(); } Console.ReadKey(); } } In first query we are trying to fetch 2 books in IEnumerable interface. var booksIEnumerable = (from book in context.Books select book) .AsEnumerable<Book>().Take(2).ToList(); Lets see what above LINQ query has been executed in SQL Server with the help of SQL Server profiler (for IEnumerable). Below query is traced in profiler. The query is simple SELECT statement without any where clause or TOP statement. It means it selecting all rows from SQL server database and just pick 2 records on client side. SELECT [b].[BookId], [b].[Price], [b].[Title] FROM [Books] AS [b] The diagram shows graphical representation of how IEnumerableworks. In first query we are trying to fetch 2 books in IQueryableinterface. var booksIQurable = (from book in context.Books select book) .AsQueryable<Book>().Take(2).ToList(); Lets see what above LINQ query has been executed in SQL Server with the help of SQL Server profiler (for IQueryable). Below query is traced in profiler. The TOP filter has been applied with parameter and its value = 2, so it means it fetch only 2 records from Books table. So it avoids fetching unnecessary data from database. exec sp_executesql N'SELECT TOP(@__p_0) [b].[BookId], [b].[Price], [b].[Title] FROM [Books] AS [b]',N'@__p_0 int',@__p_0=2 The diagram shows graphical representation of how IQueryable works. Download Source Code https://github.com/mayurlohite/IEnumerableVsIQueryable See the difference in action, watch this video https://www.youtube.com/watch?v=1x7Pf5geDd4 Conclusion Hence, when working with in-memory collections—where data is kept locally in the memory of the application—select IEnumerable<T>. When working with huge data sets or querying external data sources, use IQueryable<T> as it enables effective server-side processing and query optimization. Your performance needs and the type of data source will determine which option is best. If you have any questions, Please connect me on LinkedIn. Explore more articles.
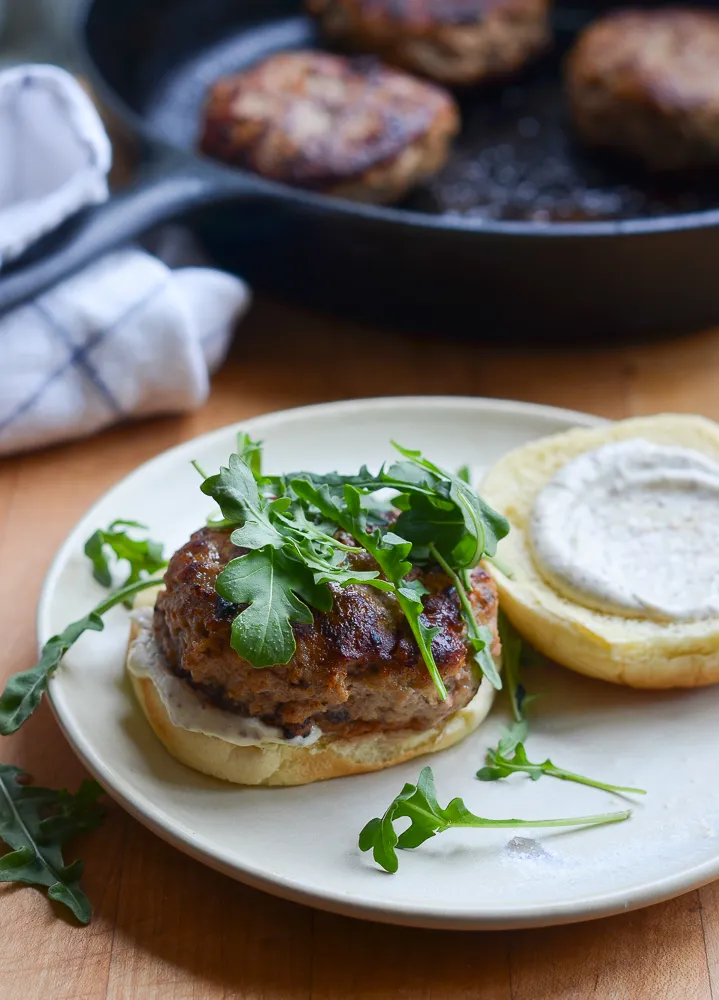
Skillet Turkey Burgers
Juicy and savory with a well-browned crust, these skillet turkey burgers rival the best beef burgers. If you’re a beef burger lover, you might think that turkey burgers can’t measure up to the real thing – and, in most cases, you’d be correct. But these skillet turkey burgers, modestly adapted from Cook’s Illustrated, are delicious in their own right. They have a juicy texture, deep savory flavor, and gorgeous browned crust. The secret is adding ricotta cheese, a bit of bread crumbs, Dijon mustard, and Worcestershire sauce to the burger mix. If you’d like to try some variations, consider adding a few tablespoons of finely chopped fresh herbs, a clove of minced garlic, or thinly sliced scallions. Serve the turkey burgers on buns or rolls, garnished as you like. For more ways to lighten traditional ground beef recipes by substituting ground turkey, see my turkey meatballs, turkey meatloaf and turkey chili. What You’ll Need To Make Skillet Turkey Burgers Step-by-Step Instructions Place ground turkey in a medium-size bowl. Add salt, pepper, Worcestershire sauce, ricotta cheese, bread crumbs, and mustard. Using your hands, mix until well blended. Divide meat mixture into 4 equal portions. Lightly toss one portion from hand to hand to form a ball, then lightly flatten ball with fingertips into a 3/4-inch-thick patty with a slight depression in the center (this prevents the burgers from puffing up when cooked). Repeat with remaining portions. Heat a large, heavy, ovenproof skillet over medium heat until very hot, 4 to 5 minutes. Add the oil to the pan and swirl to coat the bottom. Add the burgers and cook over medium heat without moving the burgers until the bottom side of each is dark golden brown and crusted, 3 to 4 minutes. Turn the burgers over; continue to cook until the bottom side is light brown but not yet crusted, about 3 minutes longer. Transfer the pan to the oven and continue cooking for 7 to 8 minutes, or until burgers are completely cooked (an instant-read thermometer inserted from the side of the burger into the center should register 160°F). Remove the turkey burgers from the pan and serve immediately. Note: This recipe has been written by Jenn Segal and republished on MudMatter with Author’s Permission. Please find the original link here – Skillet Turkey Burgers.
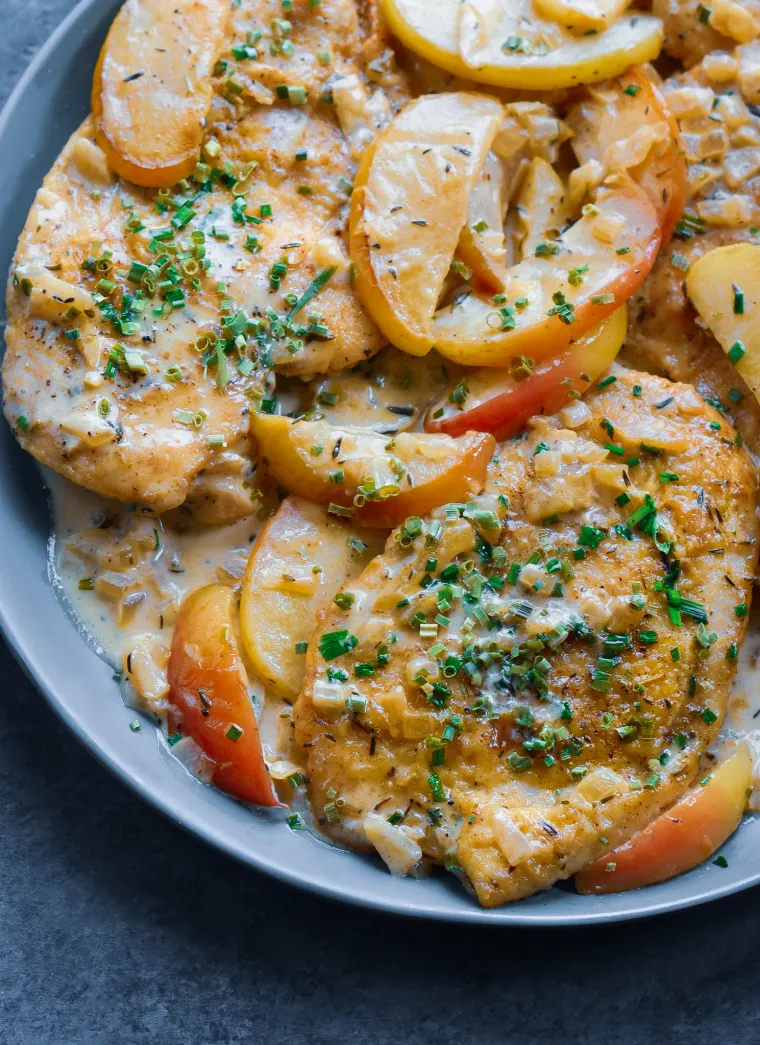
Chicken Fricassee with Apples
Chicken fricassee with apples is the perfect marriage of sweet and savory. Halfway between a sauté and a stew, chicken fricassee is an old-fashioned dish of golden sautéed chicken in a creamy sauce. This updated version with apples, adapted from Cook’s Country, is perfect for fall. The sauce is made with equal parts chicken broth, apple cider and cream, giving the dish a savory yet fruity complexity, while a splash of cider vinegar at the end adds brightness. The sautéed apples add tart-sweet flavor and also make the dish feel a little fancy. I buy two large chicken breasts and slice them in half horizontally, which makes four nice portions that cook quickly in one batch. I don’t recommend using the pre-sliced chicken breasts sold at the supermarket — they are typically very thin, which means you’d need more of them and would have to cook the chicken in two batches. If you don’t want to bother with slicing the chicken breasts yourself, chicken tenderloins are a great alternative. Serve with a simple green vegetable, like roasted Brussels sprouts, along with rice, egg noodles, or mashed potatoes. What You’ll Need To Make Chicken Fricassee with Apples Step-by-Step Instructions Slice the chicken breasts in half horizontally to form four flat fillets. (Skip this step if using chicken tenderloins; instead, using the palm of your hand, gently flatten the tenderloins so that they are an even 1/2-inch thickness.) Pat the chicken dry with paper towels and season all over with 1 teaspoon salt and 1/2 teaspoon pepper. Spread the flour in a shallow dish. Dredge the chicken in the flour to coat, shaking to remove excess; transfer to a plate and set aside. Melt 1 tablespoon of the butter with 1 tablespoon of the oil in a 12-inch nonstick skillet over medium-high heat. Add the apples to the pan and season with 1/4 teaspoon salt and 1/4 teaspoon pepper. Cook the apples, stirring occasionally, until lightly browned and softened, 6 to 8 minutes. Transfer to a second plate; set aside. Melt the remaining 1 tablespoon butter with the remaining tablespoon oil in the now-empty skillet over medium-high heat and add the chicken. Cook until lightly browned but not quite cooked through, about 2 minutes per side. Set the partially cooked chicken on another plate and set aside. Add the onion, thyme, a heaping 1/4 teaspoon salt, and 1/4 teaspoon pepper to now-empty skillet. Cook over medium heat until the onion is softened and browned, 4 to 5 minutes. Add the cider and broth to the skillet, increase the heat to high, and bring the mixture to a boil. Cook, uncovered, until the liquid is reduced by approximately half, about 5 minutes. Add the cream and bring to a boil. Add the cream and bring to a boil. Add the chicken and any accumulated juices back to the skillet, reduce the heat to low, and simmer, uncovered, until the chicken is cooked through, 2 to 3 minutes. Stir in the vinegar and apples. Taste the sauce and adjust the seasoning, if necessary. Spoon the sauce and apples over the chicken, sprinkle with the chives, and serve. Note: This recipe has been written by Jenn Segal and republished on MudMatter with Author’s Permission. Please find the original link here – Chicken Fricassee with Apples.
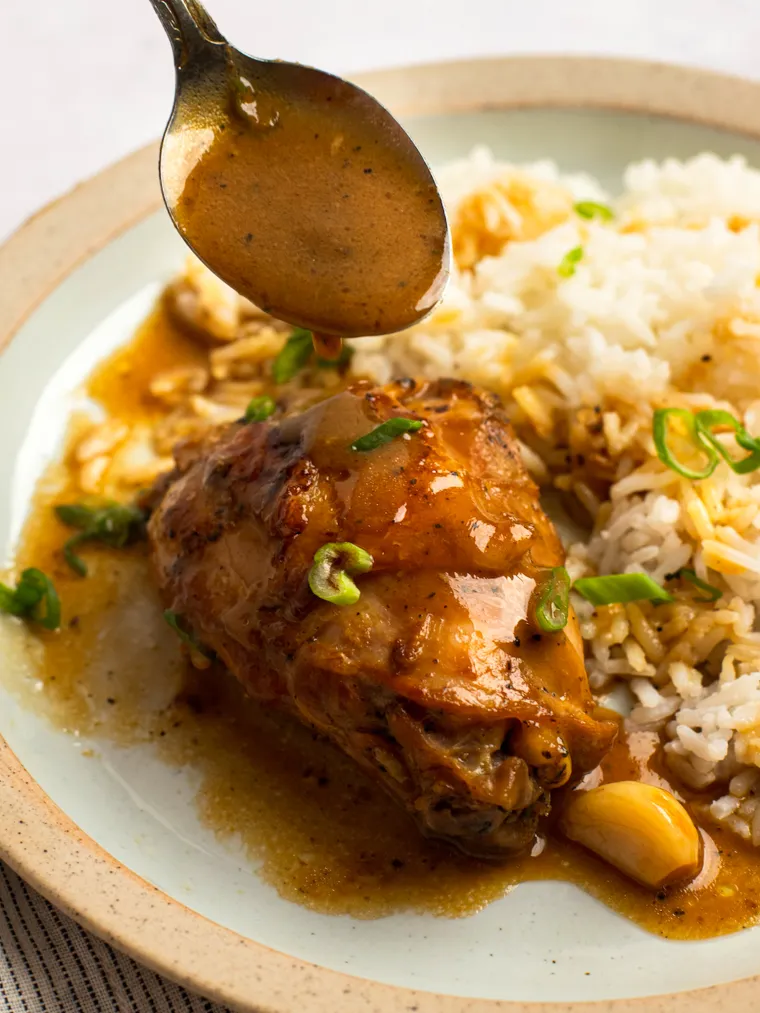
Filipino Chicken Adobo
An iconic Filipino dish, chicken adobo features succulent chicken simmered in a sauce of vinegar, soy sauce, garlic, bay leaves, black pepper, and creamy coconut milk. Adobo is a beloved dish in the Philippines that involves simmering meat in a tangy sauce made with vinegar, soy sauce, garlic, and spices like bay leaves and black pepper. There are many ways to make adobo, but my personal favorite is a regional variation made with chicken and coconut milk, inspired by Filipino Chef Romy Dorotan from Purple Yam in Brooklyn. The addition of coconut milk helps to balance the tanginess of the vinegar while adding a creamy texture to the sauce. The dish remains tangy, but the flavors are all in harmony, making it a delicious and satisfying meal. To enjoy chicken adobo at its best, serve it over a bed of fragrant jasmine rice to soak up the luscious sauce, and add a vegetable, such as roasted carrots or asparagus, to complete the dish. Whether you’re a fan of Filipino cuisine or just looking for a new and exciting recipe to try, chicken adobo is sure to impress! What You’ll Need To Make Chicken Adobo Step-by-Step Instructions Begin by trimming the chicken thighs: cut off any excess fat or flaps of skin with kitchen shears (it’s much easier than using a knife). If you’d like to use a whole cut up chicken, go right ahead. Drumsticks would also work well, as would bone-in, skin-on chicken breasts. Marinate the chicken in the soy sauce for about an hour. Next, sear the chicken, skin side down, in a skillet for about ten minutes. The skin will become crisp and turn a rich brown color. Set the chicken aside. Whisk the coconut milk, vinegar, sugar and pepper into the soy sauce. Discard the fat and wipe the pan clean. Then add the sauce to the pan. Add the garlic and bay leaves. Place the chicken in the sauce, skin side up, and bring to a boil. Reduce the heat and simmer, uncovered, until the chicken is cooked through, about 35 minutes. Transfer the chicken to a platter and reduce the sauce until thickened. Then place the chicken back into the sauce (or pour the sauce over the chicken on a platter) and scatter with scallions. Serve with rice and enjoy. Note: This recipe has been written by Jenn Segal and republished on MudMatter with Author’s Permission. Please find the original link here – Filipino Chicken Adobo.
Grilled Chicken Wings with Seasoned Buffalo Sauce
I love the flavor and ease of cooking chicken wings on the grill. They are truly no fuss, no muss and finger lickin’ good! Classic Buffalo chicken wings are fried but I love the flavor and ease of cooking them on the grill. They are truly no fuss, no muss and finger-lickin’ good! The key is to cook them over a moderate flame so that the fat renders out and the skin gets nice and crispy. You can serve them plain — they are perfectly delicious as is — but the seasoned Buffalo sauce takes them over the top. The sauce is mild enough for most kids. As you can see, my son and his friends polished off an entire 3-pound test batch in about ten minutes! What you’ll need to make Grilled Chicken Wings with Buffalo Sauce You can buy chicken wings already cut up or whole. If you buy them whole, the wings will consist of three parts: the drum, the flat/double-boned “wing” part, and the tip. To cut up a whole wing, start by cutting off the tip (which you can either discard or save for stock), then cut between the drum and the wing part. Try to cut the sections apart at the joints, where the cartilage is softer than solid bone. It’s easy once you get the hang of it. Step-by-step instructions Begin by seasoning the wings with salt and pepper. Grill the wings over moderate heat, turning frequently, until golden. You don’t want the wings to char at all, so keep a close eye on the flame. Meanwhile, make the sauce by melting the butter with the garlic in the microwave. Stir in the hot sauce and spices and set aside. When the wings are done, dip them in the sauce. (Alternatively, you can serve the wings plain with the sauce on the side). Serve immediately and enjoy! Note: I like Frank’s Hot Sauce for this recipe because it’s pretty mild. For spicier wings, use a hotter sauce. Note: This recipe has been written by Jenn Segal and republished on MudMatter with Author’s Permission. Please find the original link here – Grilled Chicken Wings with Seasoned Buffalo Sauce.
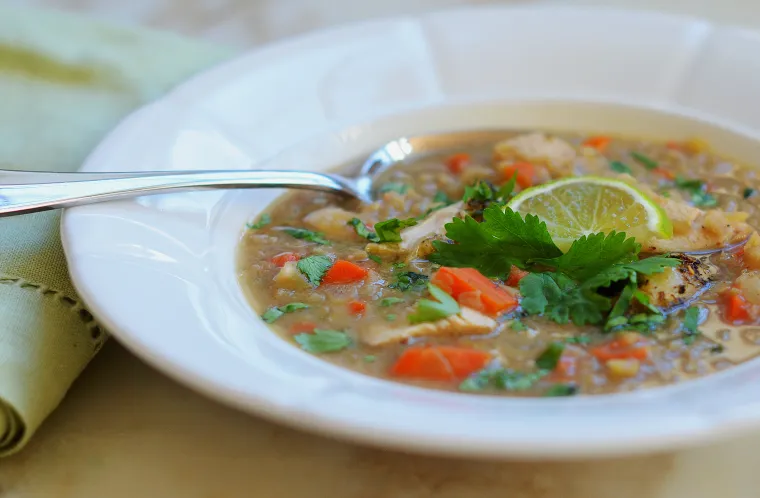
Indian Spiced Red Lentil & Chicken Soup
This red lentil and chicken soup is a quick and easy version of Mulligatawny, the curry-flavored soup popular in Anglo-Indian cuisine. This red lentil and chicken soup is a quick and easy version of Mulligatawny, the curry-flavored soup popular in Anglo-Indian cuisine. If you’re a Seinfeld fan, you might remember it as Kramer’s favorite soup from the infamous Soup Nazi. Made with a rotisserie chicken and canned coconut milk, it’s a one-pot supper that you can have on the table in 45 minutes (or less, if you’re lazy like me and use a food processor to chop the vegetables). A little heads up: don’t skip the garnishes. The fresh cilantro and lime brighten up the flavor and add a much-needed pop of color. To make the dish a little heartier, sometimes I like to serve it with a scoop of basmati rice. But, really, store-bought or homemade naan is all you need to complete the meal. What you’ll need to make red lentil and chicken soup How to make red lentil and chicken soup Before we get started, a few words about the ingredients. It’s important to use red lentils, as opposed to another variety; they cook quickly, add wonderful flavor and thicken the soup nicely. They won’t hold their shape once cooked — that’s okay, they are intended to break down and give the soup a hearty texture. And Garam Masala is a fragrant Indian spice blend typically containing peppercorns, mace, cinnamon, cloves, cardamom, and nutmeg. It’s available at most large grocery stores (McCormick makes it as part of their Gourmet Collection), but if your regular supermarket does not carry it, you can always find it at Whole Foods or just substitute curry powder. Begin by chopping the vegetables and apple. I use a food processor; if you do the same, be sure to roughly chop the vegetables first, so that they process evenly. And be sure process only until the mixture is roughly chopped, not puréed. Heat the oil in a large pot. Add the Garam Masala and cook for about 30 seconds, until fragrant. Add the vegetable/apple mixture. Cook, stirring frequently, until the mixture is softened. Add the chicken broth, coconut milk, lentils, ginger and salt. Bring to a boil, then reduce the heat to low and simmer for about 15 minutes, until the lentils are tender and starting to break down. Stir in the chicken and fresh lime, then taste and adjust seasoning if necessary. Ladle the soup into bowls and sprinkle generously with fresh chopped cilantro. Serve with lime wedges. Note: This recipe has been written by Jenn Segal and republished on MudMatter with Author’s Permission. Please find the original link here – Indian Spiced Red Lentil & Chicken Soup.

Chicken Meatballs with Tomato-Balsamic Glaze
These baked chicken meatballs make a quick, easy, and kid-friendly supper. If you’re looking for an alternative to saucy, rich beef meatballs, these light and elegant chicken meatballs fit the bill. I love them with mashed potatoes, puréed cauliflower, or buttered noodles for a quick and easy weeknight meal. They also make a delicious appetizer — just make them smaller and spear them with toothpicks. What you’ll need to make chicken meatballs with tomato-balsamic glaze When purchasing ground chicken, stay away from extra-lean all breast meat; if the meat is too lean, the meatballs will come out dry and lacking in flavor. Tomato paste can be purchased in a small can or tube. While I use canned here, the tubed variety is more practical because you can use just what you need and store it in the fridge until you need it again. To preserve canned tomato paste longer, freeze it in tablespoon-sized portions (use an ice cube tray or put tablespoon-sized portions on a cookie sheet). Once frozen, transfer these portions into a freezer-safe plastic bag for future use. The recipe calls for pecorino Romano cheese, a hard Italian sheep milk cheese. It is similar to Parmigiano Reggiano, in that both cheeses have salty, umami-rich flavors, but pecorino Romano is saltier, tangier, and stronger in flavor. How to make chicken meatballs with tomato-balsamic glaze To begin, combine the egg, parsley, tomato paste, garlic, milk, salt and pepper in a large bowl. Mix well with a wire whisk, making sure the tomato paste is completely dissolved. Add the ground chicken, grated cheese and breadcrumbs. Use your hand to mix the ingredients together; it will be somewhat wet. Using wet hands, form medium-sized balls and place into an ungreased 9-x-13-in baking dish. Next, make the glaze by combining the tomato paste, olive oil, balsamic vinegar and sugar in a small bowl. Whisk to combine. Brush the glaze evenly over the meatballs. Bake for about 30 minutes, or until an instant-read thermometer inserted into the center of a meatball registers 160°F. Remove from the oven and serve. Note: This recipe has been written by Jenn Segal and republished on MudMatter with Author’s Permission. Please find the original link here – Chicken Meatballs with Tomato-Balsamic Glaze.

How to check if string is null or empty? or it does not contains anything in C#
In every project developed within the .NET framework, whether it's a web, console, Windows, or mobile application, it is crucial to validate whether a string is empty, null, or contains anything, including whitespace. Therefore, I'm sharing this C# tip to demonstrate the optimal approach for checking if a string is null, empty, or consists solely of blank space. Certainly! In C#, you can efficiently check if a string is null, empty, or contains only whitespace using the string.IsNullOrWhiteSpace method. This method returns true if the string is null, empty, or consists only of white-space characters; otherwise, it returns false. The term "white space" includes all characters that are not visible on screen. For example, space, line break, tab and empty string are white space characters. Lets take example. Create a new console application in Visual Studio. Try this code below. class Program { static void Main(string[] args) { string nullString = null; string emptyString = ""; string whitespaceString = " "; string nonEmptyString = "Mudmatter"; Console.WriteLine("Result by using checking double quotes method - Wrong Method"); Console.WriteLine("{{nullstring}} is null or empty? {0}", nullString == ""); Console.WriteLine("{{emptyString}} is null or empty? {0}", emptyString == ""); Console.WriteLine("{{whitespaceString}} is null or empty? {0}", whitespaceString == ""); Console.WriteLine("{{nonEmptyString}} is null or empty? {0}", nonEmptyString == ""); Console.WriteLine(""); Console.WriteLine("---------------------------------------"); Console.WriteLine(""); Console.WriteLine("Result by using IsNullOrEmpty method - OK but not good"); Console.WriteLine("{{nullstring}} is null or empty? {0}", string.IsNullOrEmpty(nullString)); Console.WriteLine("{{emptyString}} is null or empty? {0}", string.IsNullOrEmpty(emptyString)); Console.WriteLine("{{whitespaceString}} is null or empty? {0}", string.IsNullOrEmpty(whitespaceString)); Console.WriteLine("{{nonEmptyString}} is null or empty? {0}", string.IsNullOrEmpty(nonEmptyString)); Console.WriteLine(""); Console.WriteLine("----------------------------------------"); Console.WriteLine(""); Console.WriteLine("Result by using IsNullOrWhiteSpace method - Best method"); Console.WriteLine("{{nullstring}} is null or empty? {0}", string.IsNullOrWhiteSpace(nullString)); Console.WriteLine("{{emptyString}} is null or empty? {0}", string.IsNullOrWhiteSpace(emptyString)); Console.WriteLine("{{whitespaceString}} is null or empty? {0}", string.IsNullOrWhiteSpace(whitespaceString)); Console.WriteLine("{{nonEmptyString}} is null or empty? {0}", string.IsNullOrWhiteSpace(nonEmptyString)); Console.ReadKey(); } } Output: Short Video https://www.youtube.com/watch?v=t-yumUzLIoY Conclusion There are various methods to check if string is empty or not but the best method is using the string.IsNullOrWhiteSpace method. This method can check empty, null & any white space characters which are not visible on screen. So I recommend to use the string.IsNullOrWhiteSpace method.